Transformation Pipeline
Each Thing Type can have a Transformation Pipeline - a visual, graph-based data processing pipeline that runs on incoming telemetry before it is stored. You use it to validate, enrich, or normalize raw machine data for that Thing Type.
The pipeline is optional. If none is configured or none is active, incoming data is stored as-is.
The Transformation Pipeline is powered by GoRules, an open-source business rules engine. Refer to the GoRules documentation for in-depth details on expression syntax, decision table behavior and the rules engine internals.
Why Use a Transformation Pipeline
Raw telemetry from machines is often unstructured, uses different units, or needs enrichment before it becomes useful. The Transformation Pipeline lets you:
- Validate incoming data against a schema - reject or flag malformed payloads
- Normalize values - convert units, rename fields, or apply offset/factor corrections
- Enrich data - compute derived values or add contextual fields using expressions or JavaScript
- Apply decision logic - map sensor values to semantic labels using decision tables
Accessing the Pipeline Editor
The Transformation Pipeline is configured per Thing Type:
- Navigate to Onboarding > Thing Types
- Select a Thing Type to open its detail page
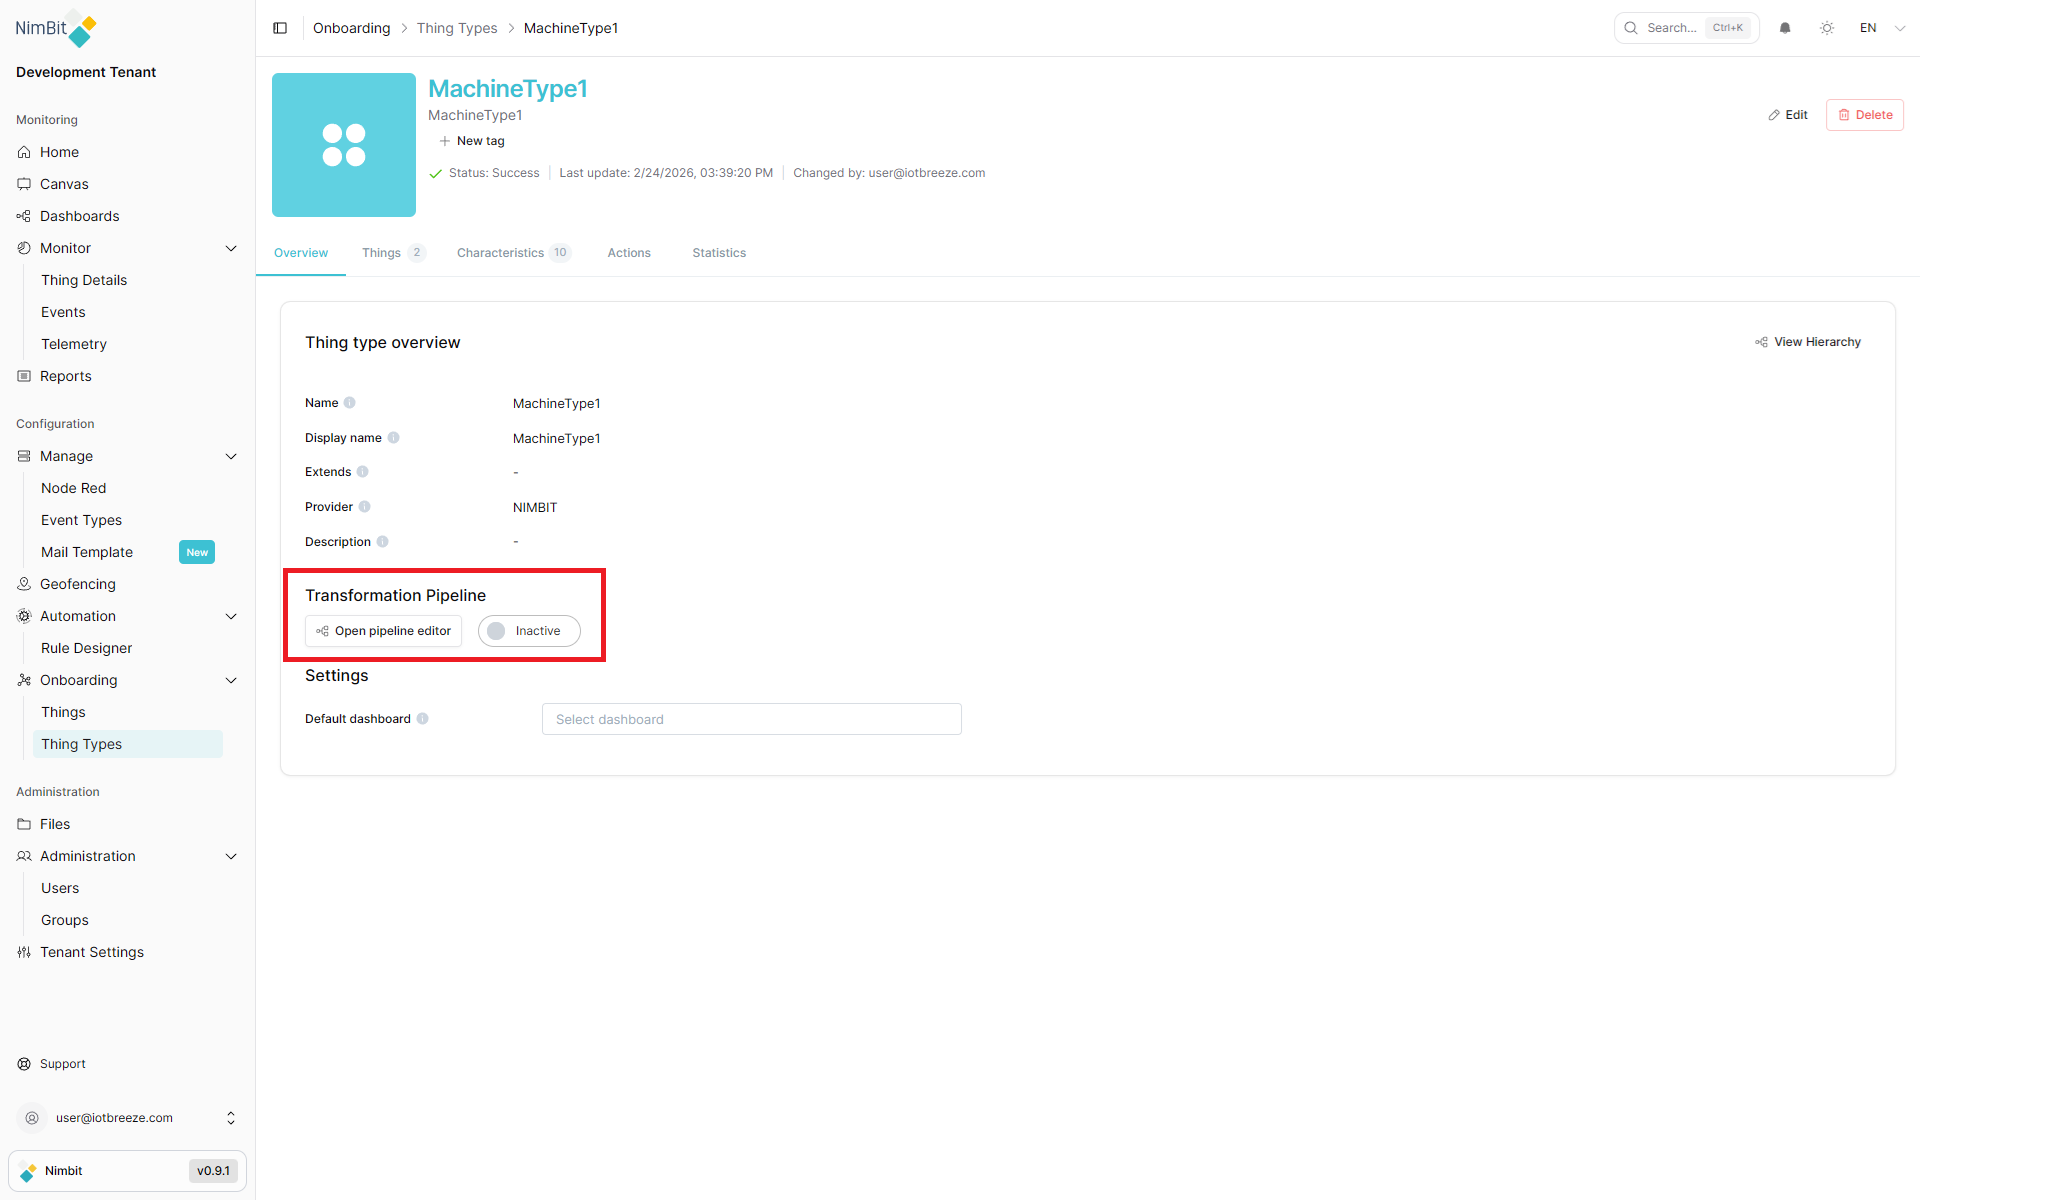
- On the Overview tab, find the Transformation Pipeline section
- Click Open pipeline editor
The Transformation Pipeline section on the Overview tab also shows the current pipeline status: Active or Inactive.
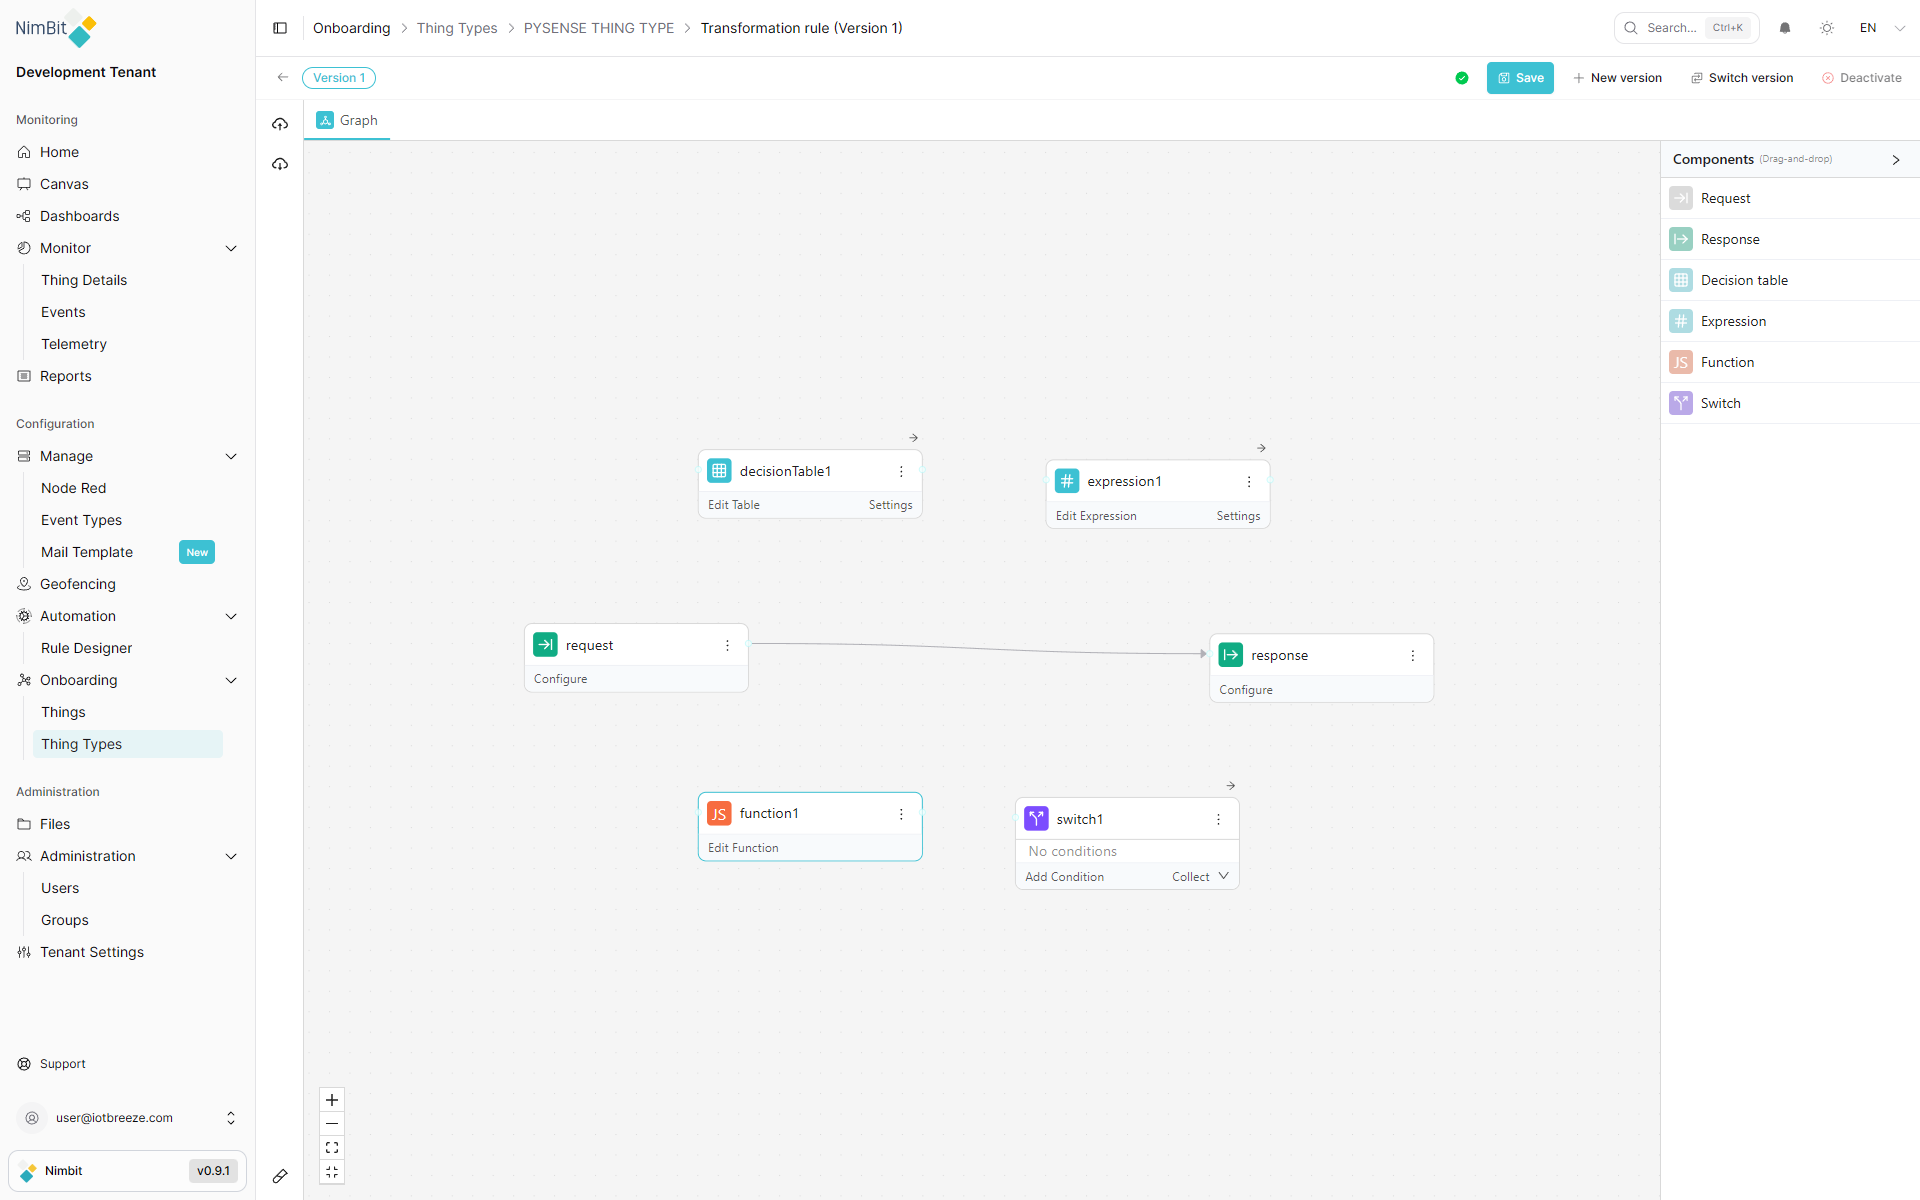
Pipeline Editor Layout
The editor opens under the breadcrumb Onboarding > Thing Types > [ThingType] > Transformation rule (Version N).
Header Toolbar

| Control | Description |
|---|---|
| Back button | Return to the Thing Type detail page (prompts to discard unsaved changes) |
| Version badge | Displays the currently loaded version (e.g., "Version 1") |
| Validation status | Icon showing whether the current graph is valid. Hover to see the validation message. |
| Save | Save changes to the current version. Disabled if the graph is invalid or has no changes. |
| New version | Create a new pipeline version based on the current graph. Previous versions remain intact. |
| Switch version | Open a version list to load a different version into the editor |
| Activate / Deactivate | Toggle the live status of this version. Activate deploys the pipeline; Deactivate stops processing. |
Activate is disabled when the graph is invalid or there are unsaved changes. Save first, then activate. The button becomes Deactivate once the version is active.
Draft Toolbar (Active Versions with Unsaved Changes)
When you edit an already-active version, a floating toolbar appears at the bottom of the canvas:
| Control | Description |
|---|---|
| Apply Draft | Publish your draft changes to the live pipeline immediately |
| Reset Draft | Discard the draft and revert to the currently deployed version |
| Draft | View and edit your unpublished draft changes |
| Diff | View a side-by-side comparison of your draft against the deployed active version |
Use Apply Draft to publish changes to the active pipeline. The Reset Draft action permanently discards your draft and cannot be undone.
Left Sidebar
| Control | Description |
|---|---|
| Export (upload) | Download the pipeline definition as a JSON file |
| Import (download) | Upload a previously exported pipeline JSON file |
| Collapse button | Hide or show the left sidebar |
Canvas Area
The canvas is the main workspace where you build your pipeline by placing and connecting nodes.
| Control | Description |
|---|---|
| Zoom in | Increase zoom level |
| Zoom out | Decrease zoom level |
| Fit view | Auto-fit all nodes into the visible viewport |
| Compress | Arrange nodes compactly |
Components Panel
The Components panel on the right side lists the available node types. Drag any component from this panel onto the canvas to add it. The panel can be collapsed with the arrow button.
Tab Bar
Above the canvas, a tab bar shows open editor panels. The Graph tab is always present and shows the visual canvas. When you click Edit Table, Edit Expression, or Edit Function on a node, that node's editor opens as an additional tab.
Building a Pipeline
Adding Nodes
Drag a component from the Components panel onto the canvas. The node appears with a default name (e.g., decisionTable1, expression1, function1).
Connecting Nodes
Hover over a node to reveal its connection handles. Drag from an output handle (right side) to an input handle (left side) of another node to create an edge. Data flows from left to right through connected nodes.
When multiple nodes connect to a single downstream node, their outputs are merged into one object. If multiple upstream nodes produce the same field name, later connections overwrite earlier ones.
Any node can reference the output of an upstream node by name using the $nodes variable - for example, $nodes.expression1.temperature in an expression or input.$nodes.expression1.temperature in a Function node.
Deleting Nodes and Edges
- Node: Click the node to select it, then use the more (⋯) menu and select Delete, or press Backspace
- Edge: Click an edge to select it, then click the delete button that appears on it
Node Menu
Every node has a more (⋯) button in its header. Clicking it shows:
| Option | Description |
|---|---|
| Documentation | Open reference documentation for this node type |
| Delete | Remove the node from the canvas |
Node Types
Request
The Request node is the pipeline's entry point. It validates incoming telemetry data against a JSON Schema before the data flows further.
Configure opens a Schema tab with a JSON Schema editor:
- Write or paste a JSON Schema to define the expected data structure
- Use the format button to auto-format the schema
- Use the Import button to open the "Convert to JSON Schema" dialog - paste a sample JSON or JSON5 payload and the editor converts it to a schema automatically
If no JSON Schema is set, validation is skipped and all incoming data passes through unchanged.
Incoming Data Structure
The pipeline receives the following payload for each telemetry message. Use this structure when writing schemas and expressions:
{
  "tenant": "your-tenant-name",
  "thingType": "YourThingTypeName",
  "id": "thing-type-id",
  "data": {
    "measureName1": "value1",
    "measureName2": "value2"
  },
  "geo": {
    "altitude": 42,
    "heading": 180,
    "latitude": 48.137,
    "longitude": 11.576,
    "speed": 0
  },
  "tags": {
    "propertyName": "propertyValue"
  }
}
data- the measure values sent by the device (keyed by measure name)geo- GPS/location data if the device reports ittags- timeseries-relevant properties of the Thing
Response
The Response node is the pipeline's exit point. It defines the expected shape of the output data using the same JSON Schema editor as the Request node.
Decision Table
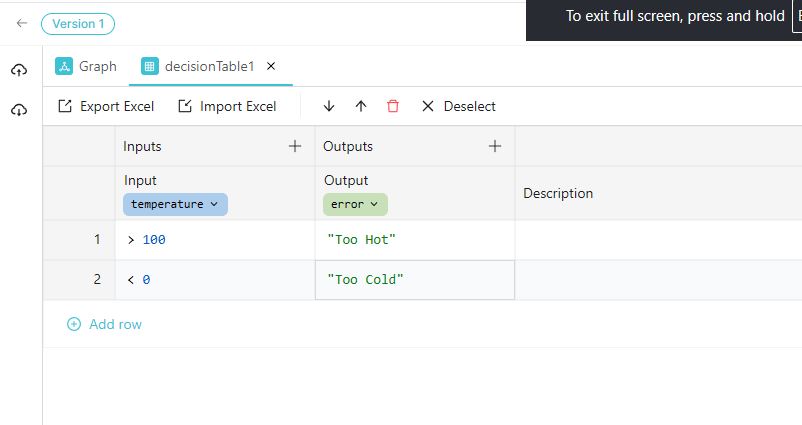
The Decision Table node maps input values to output values using a rule table - similar to an if/else if/else chain but expressed as a spreadsheet.
Edit Table opens the table editor:
| Control | Description |
|---|---|
| Inputs column | Conditions to evaluate (click the column header to configure the input field) |
| Outputs column | Values to output when conditions match |
| + (add column) | Add additional input or output columns |
| Add row | Add a new condition/output row |
| Export Excel | Download the table as an .xlsx file |
| Import Excel | Upload a previously exported .xlsx to replace the table contents |
Each input column header configures the Input Field expression to evaluate (e.g., temperature). Click the column label to open the field editor, which also shows a Live Preview and a "Run simulation to see the results" option.
Condition Syntax
When an input column has a targeted field configured, you write only the operator and value in each cell:
| Type | Syntax | Example |
|---|---|---|
| Comparison | >, <, >=, <=, ==, != | >= 100 |
| Range (inclusive) | [min..max] | [18..65] |
| Range (exclusive) | (min..max) | (0..100) |
| List | 'a', 'b', 'c' | 'US', 'CA', 'GB' |
| Combined | and, or | > 10 and < 50 |
| Function | $ references the field value | len($) > 5 |
| Wildcard | (empty cell) | Matches everything |
Set the input field to - to write full expressions instead of operators against a single field.
Output cells can contain literals (100, "approved"), expressions (amount * 0.1), or references to upstream nodes via $nodes.
Rows are evaluated top to bottom. With the First hit policy, evaluation stops at the first match. Order rows from most specific to most general conditions.
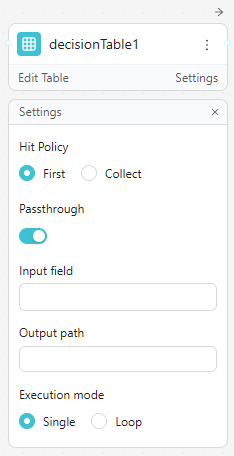
Settings panel:
| Setting | Options / Description |
|---|---|
| Hit Policy | First: return only the first matching row. Collect: return all matching rows as an array. |
| Passthrough | When enabled, if no row matches, the input data is passed through unchanged instead of producing no output |
| Input field | Override the default input expression for all conditions |
| Output path | The field path where the decision table result is written in the output object |
| Execution mode | Single: evaluate once per message. Loop: iterate over an array in the input and evaluate each item |
Expression
The Expression node computes new values or transforms existing fields using inline expressions without writing full JavaScript.
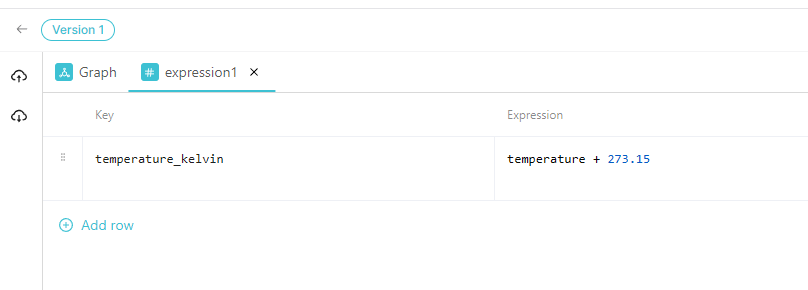
Edit Expression opens a key-value table:
| Column | Description |
|---|---|
| Key | The field name to write in the output (e.g., temperatureCelsius) |
| Expression | The formula or value to compute (e.g., temperature + 273.15) |
Click Add row to add more key-expression pairs.
Expression Syntax (ZEN)
Expressions use the ZEN expression language. The same syntax is available in Expression nodes, Decision Table conditions and Switch conditions.
Data access - use dot notation and array indexing:
customer.name- nested object fieldorder.items[0].price- array element access$nodes.MyNode.field- reference an upstream node's output by name$nodes["My Node"].field- bracket syntax for names with spaces
Operators:
| Category | Operators |
|---|---|
| Arithmetic | +, -, *, /, %, ^ (power) |
| Comparison | ==, !=, <, >, <=, >= |
| Logical | and, or, not |
| Conditional | condition ? trueValue : falseValue |
| Null coalescing | value ?? fallback |
| Range check | age in [18..65] (inclusive), score in (0..100) (exclusive) |
Built-in functions:
| Category | Functions |
|---|---|
| Math | abs(), round(), floor(), ceil(), min(), max(), sum(), avg() |
| String | len(), upper(), lower(), trim(), contains(), startsWith(), split() |
| Array | map(), filter(), some(), all(), flatMap() - use # for the current element |
| Date | d() to create/parse dates, with .year(), .month(), .day(), .add(n, unit), .diff(d2, unit) |
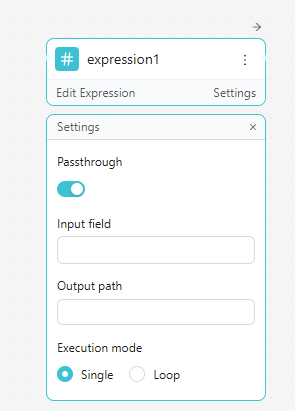
Settings panel:
| Setting | Description |
|---|---|
| Passthrough | Pass the input through unchanged when no expressions are defined |
| Input field | The field path to use as the expression context |
| Output path | Where to write the computed key-value results in the output object |
| Execution mode | Single: evaluate once. Loop: iterate over an array and evaluate each item |
Function (JS)
The Function node lets you write arbitrary JavaScript (TypeScript-typed) to transform data. Use it for logic too complex for expressions or decision tables.
Edit Function opens a code editor with a starter template:
import zen from "zen";

/** @type {Handler} **/
export const handler = async (input) => {
  return input;
};
The handler function receives the input data object and must return the transformed output. It supports async/await for asynchronous operations. Access upstream node outputs via input.$nodes.NodeName.field.
Function nodes have a 5-second execution timeout. Exceeding this limit causes the evaluation to fail.
Console tab: Shows output from console.log() calls after running a simulation. Use this to debug your function logic.
Libraries tab: Lists available packages you can import:
| Library | Description | Import |
|---|---|---|
| big.js | Arbitrary-precision decimal arithmetic | import Big from 'big.js' |
| dayjs | Date and time utilities | import dayjs from 'dayjs' |
| http | Promise-based HTTP client | import http from 'http' |
| zen | Rules engine utilities (pre-imported) | import zen from 'zen' |
| zod | Schema validation | import { z } from 'zod' |
Click + next to a library to add its import statement to the editor. Click the external link icon to open the library's documentation.
The format button (paint roller icon) auto-formats the code.

Switch
The Switch node routes data to different downstream nodes based on conditions. Each condition creates its own output handle that you can connect to a different branch of the pipeline.
Each condition row has:
- An If label
- An expression textbox where you write the condition (e.g.,
temperature > 80) - A delete button to remove that condition
Use Add Condition to add more branches. Use the First / Collect dropdown to control match behavior:
- First - data is routed only to the output handle of the first matching condition
- Collect - data is routed to the output handles of all matching conditions
Conditions are evaluated top to bottom. If no conditions match, nothing is forwarded.

Testing with the Simulator
The pipeline editor includes a Simulator panel that lets you test your pipeline before activating it. Click the test-tube icon in the left sidebar to open it.
The Simulator pre-populates a test request with:
- Random values for each measure defined on the Thing Type (respecting min/max constraints and data types)
- Random geo coordinates
- Random tag values based on the Thing Type's timeseries properties
You can edit the JSON payload to test specific edge cases, then click Run to execute the pipeline against it. The results show:
- The transformed output if the pipeline succeeds
- Error details and which node failed if validation fails
The Console tab in the Function node also captures console.log() output during simulation, making it easy to debug JavaScript functions.
Versioning
Pipelines are versioned. Each version is an independent snapshot of the pipeline graph.
| Action | Description |
|---|---|
| Save | Save the current graph changes as a draft for this version |
| New version | Create a new version from the current graph. Previous versions remain intact. |
| Switch version | Load a different version into the editor for editing or review |
| Activate | Deploy the currently loaded version - this becomes the version the DIP (Data Ingestion Pipeline) executes |
| Deactivate | Stop the currently active version from processing data |
Only one version is Active at a time. The active version processes live incoming telemetry from the DIP (Data Ingestion Pipeline). You can freely edit or create new versions without affecting the active pipeline until you explicitly activate.
Draft vs. Deployed
Every version has two states:
- Draft - the working copy with your current (possibly unsaved) edits
- Deployed - the published, live snapshot that the DIP uses
When you Save, the draft is persisted. When you Activate, the draft is deployed as the live version. If you modify an already-active version, a draft toolbar appears, letting you apply or discard your changes.
Import and Export
Use the Export (cloud-up) button to download the current pipeline as a JSON file. Use Import (cloud-down) to load a previously exported JSON, replacing the current pipeline graph.
This is useful for:
- Backing up pipeline configurations
- Copying pipelines between Thing Types or tenants
- Version control outside the platform
Common Use Cases
Validate and Pass Through
Connect Request → Response with schemas on both to validate the payload on entry and ensure the output matches the expected contract. No transformation nodes needed - just schema enforcement.
Unit Conversion
Add an Expression node between Request and Response. Add a row with:
- Key:
temperatureCelsius - Expression:
(input.tempF - 32) * 5 / 9
This appends the converted field to the output.
Label Mapping with a Decision Table
Use a Decision Table to map raw numeric sensor codes to human-readable labels:
| Input (status code) | Output (label) |
|---|---|
| 0 | OK |
| 1 | Warning |
| 2 | Error |
Conditional Routing
Use a Switch node to separate high-priority alerts from normal data. Connect the high-priority output to a Function node that calls an external HTTP endpoint and the normal output directly to Response.
Complex Transformation with JavaScript
Use a Function node when the transformation logic requires iteration, external API calls, or complex business rules that cannot be expressed in decision tables or expressions.
Related Pages
- Thing Types - Create and manage Thing Type definitions
- Rule Designer - Define validation rules that evaluate telemetry data and trigger actions
- GoRules Documentation - Reference documentation for the rules engine powering the Transformation Pipeline