Rule Designer
Overview
The Rule Designer is a visual, flow-based editor that lets you define automated validation rules for your IoT data. Rules evaluate incoming measurements from Things or Thing Types, trigger on configurable conditions and execute actions such as sending notifications, emails, webhook calls, or creating events.
A rule consists of:
- A Context Selector - which Things or Thing Types the rule applies to
- One or more Conditions - the measurement criteria that must be met
- A Trigger - the timing or state-change logic that fires the rule
- One or more Actions - what happens when the rule is triggered
Rules are versioned, support a draft/active workflow and run continuously once activated.
Rule List
Navigate to Automation → Rule Designer to reach the rule management table.
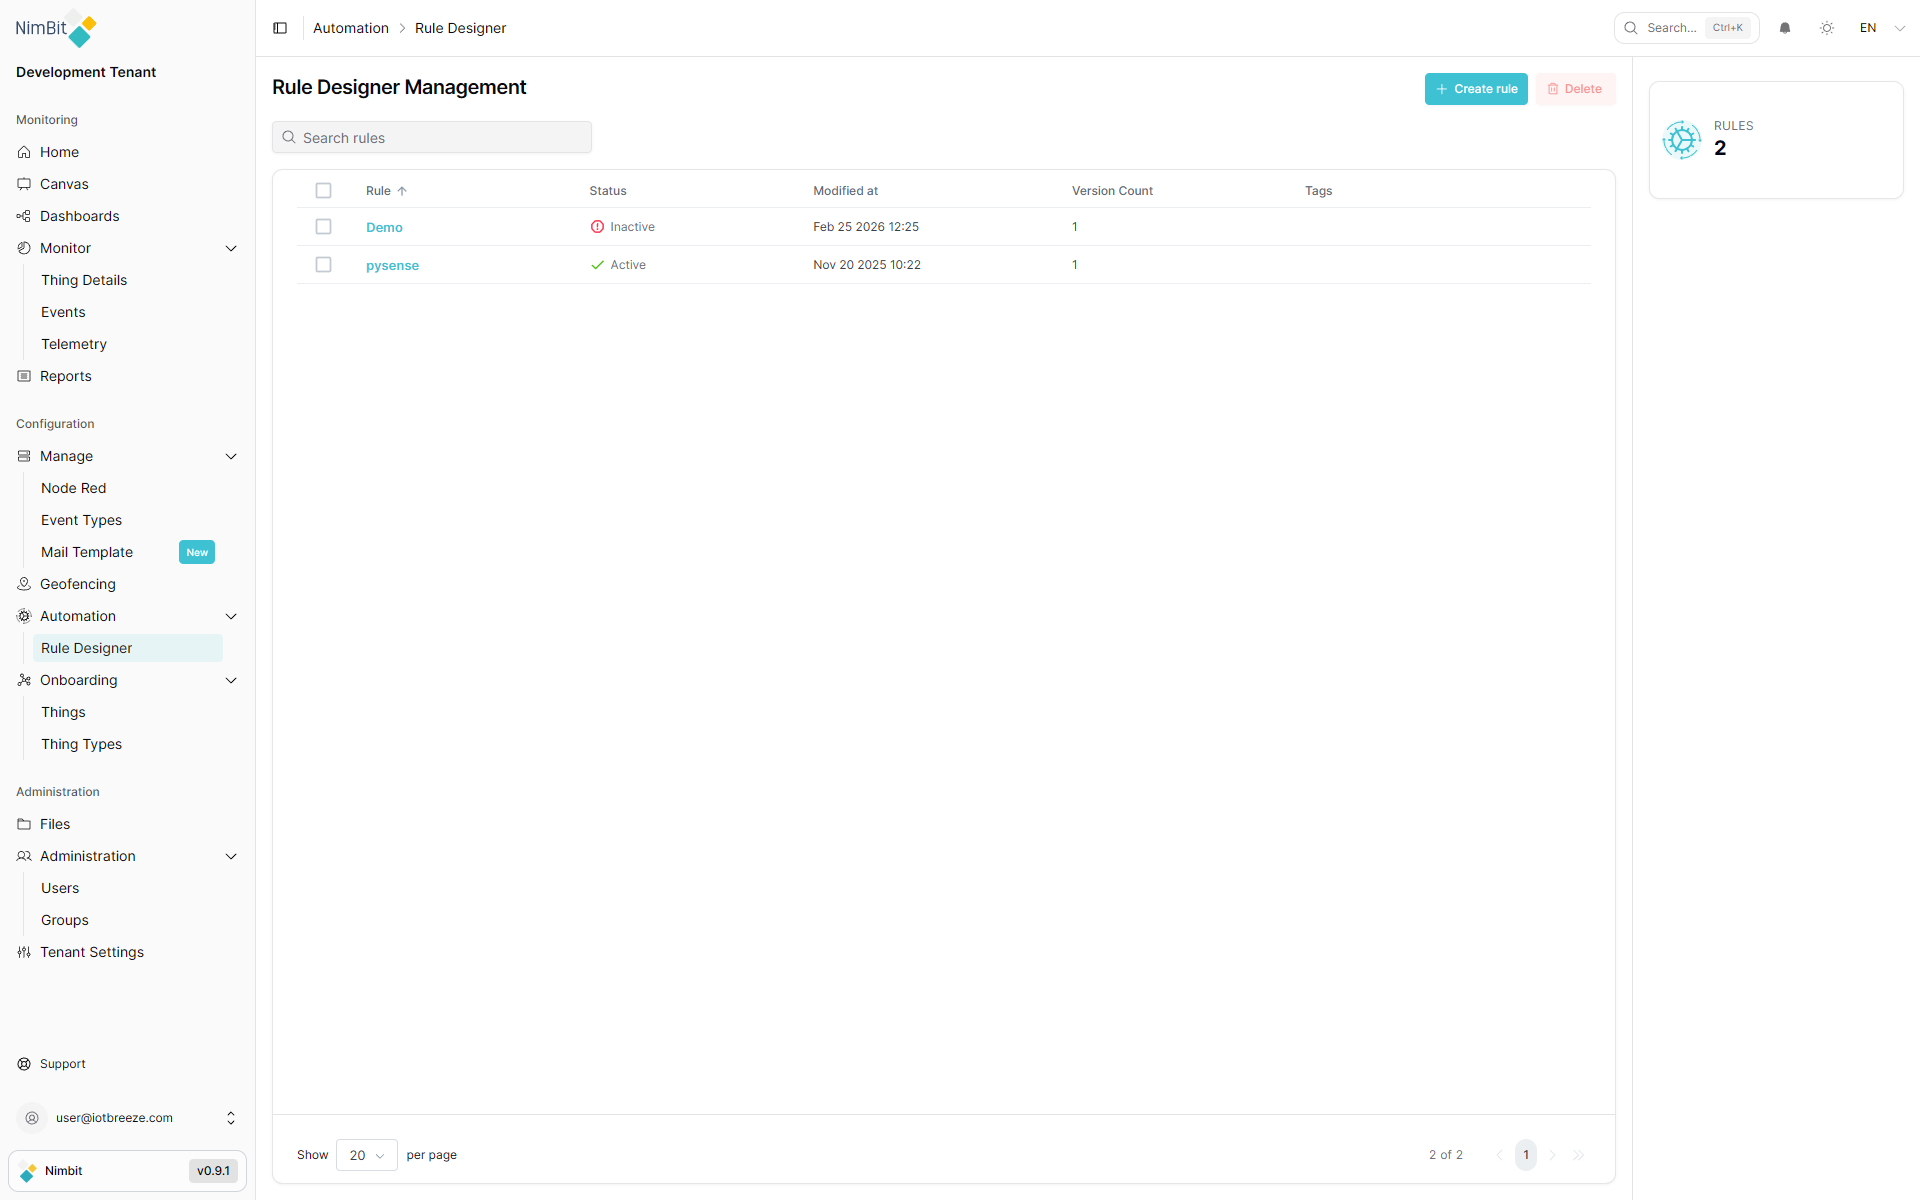
Table Columns
| Column | Description |
|---|---|
| Rule | Name and optional description of the rule |
| Status | Active or Inactive |
| Modified at | Date and time of the last modification |
| Version Count | Total number of versions created for this rule |
| Tags | Searchable labels assigned to the rule |
Searching Rules
Use the search bar at the top to filter rules by name. Results update in real time. Click × to clear the search.
Creating a Rule
Click Create rule in the top-right corner. A drawer form opens with the following fields:
| Field | Required | Description |
|---|---|---|
| Name | ✅ Yes | Unique identifier for the rule (max 123 characters) |
| Description | ❌ No | Multilingual description - select the language via the flag icon |
| Severity | ❌ No | Alert level when the rule fires: Info, Warning, Error, or Critical |
| Search Tags | ❌ No | Comma-separated labels used for filtering (creatable, max 30 chars each) |
Click Save to create the rule and its first version. You are then redirected to the Flow Editor.
Deleting Rules
Select one or more rules using the checkboxes, then click the Delete button (shown with a count badge). Confirm the deletion in the dialog that appears. This action cannot be undone.
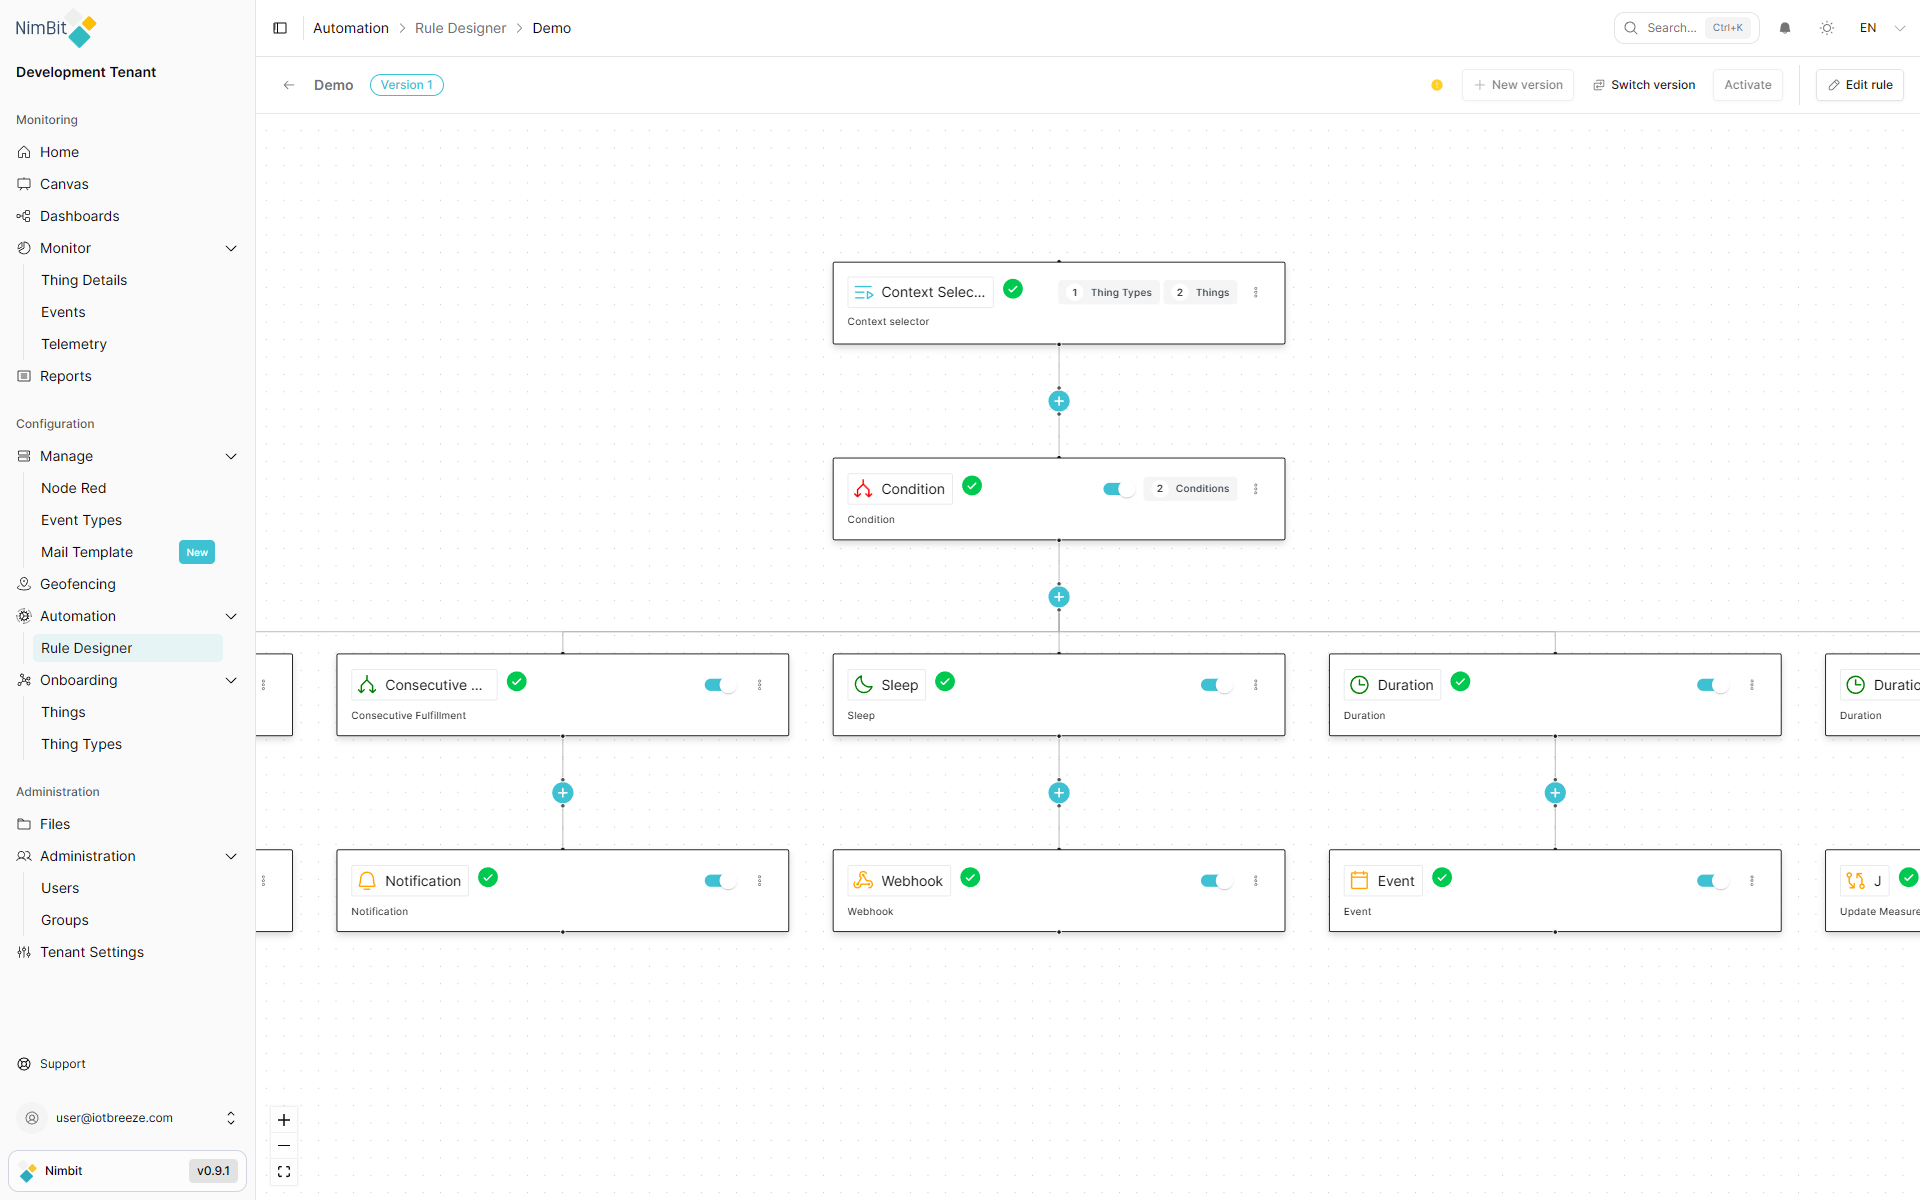
Flow Editor
Clicking on a rule name opens the Flow Editor - a node-based canvas where you build the rule logic.
Header Toolbar
The header at the top of the editor provides the following controls:
| Control | Description |
|---|---|
| ← Back arrow | Returns to the Rule List |
| Rule name & version | Displays the current rule name and selected version number. Shows a saving indicator while changes are auto-saved |
| New version | Creates a new version of the rule (disabled while viewing the active flow) |
| Switch version | Opens the version overview to switch between or inspect previous versions |
| Activate / Deactivate | Toggles the rule between active and inactive states. Activating saves the current draft. Disabled if the flow is invalid |
| Edit rule | Opens a drawer to edit the rule's name, description, severity and tags |
Draft vs. Active Mode
Each rule version maintains two separate flow states:
- Draft - the editable working copy of the flow. Changes are auto-saved with a short debounce and can also be saved manually (Ctrl+S equivalent).
- Active - the published, read-only version that is currently executing.
When a version is active and has unsaved draft changes, a floating Draft Toolbar appears at the bottom of the canvas:
| Button | Description |
|---|---|
| Apply Draft (✓) | Saves and publishes the draft as the new active flow |
| Reset Draft (↺) | Discards all draft changes and reverts to the currently active flow |
| Active / Draft toggle | Switches the canvas view between the active flow and the draft |
Note: You must be viewing the Draft mode to apply changes. Applying an invalid flow is blocked.
Flow Canvas
The canvas is built with React Flow. Nodes are connected by edges to define the evaluation order.
When a new rule is created, the canvas starts with a Context Selector node and an Add (+) node. Click the + node to add the next step in your flow.
Adding Nodes
Click the + (Add) node to select what to add next. The available options depend on the position in the flow:
- After the Context Selector: add a Condition
- After a Condition: add a Trigger
- After a Trigger: add an Action
Each node has a configuration panel on the right side.
Node Types
Context Selector
The Context Selector is always the first node. It defines the scope - which Things the rule evaluates against.
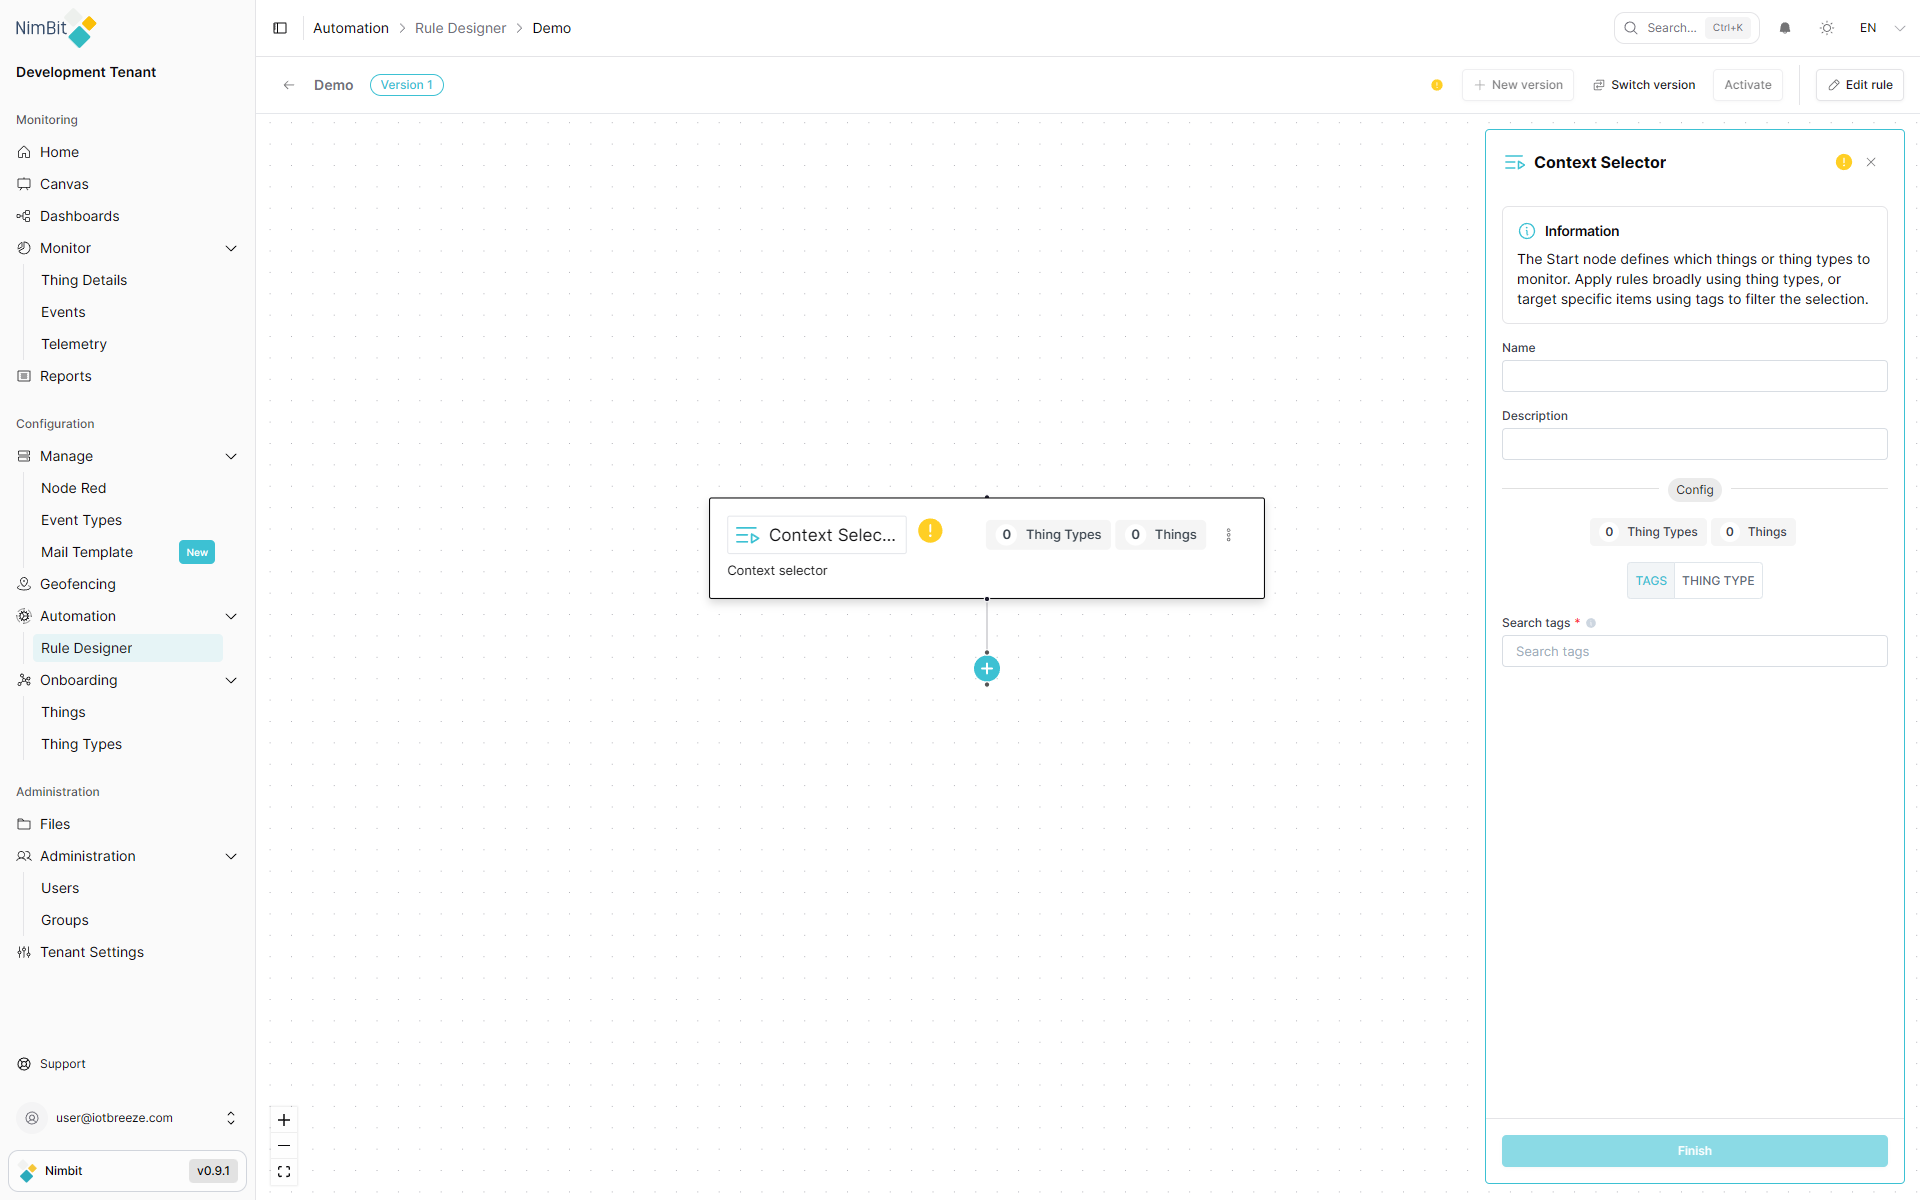
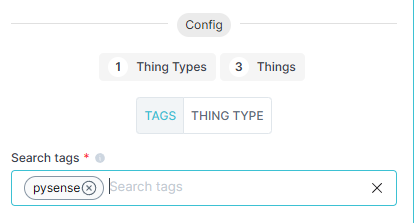
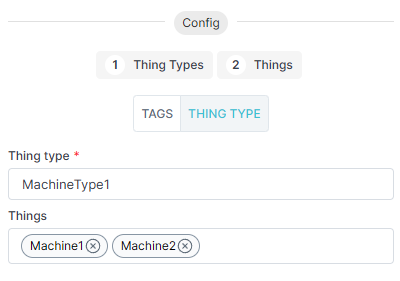
Context Modes:
| Mode | Description |
|---|---|
| Tags | Selects all Things that have the specified search tags |
| Thing Type | Selects Things belonging to a specific Thing Type, with optional fine-grained selection of individual Things |
Fields:
| Field | Description |
|---|---|
| Name | Internal label for this node |
| Description | Optional note |
| Context | Tags or Thing Type |
| Search Tags (Tags mode) | One or more tags - any Thing with at least one matching tag is included |
| Thing Type (Thing Type mode) | The Thing Type to filter by |
| Things (Thing Type mode) | Optional: limit to specific Things within the selected Thing Type |
A live count of matching Thing Types and Things is shown above the mode selector.
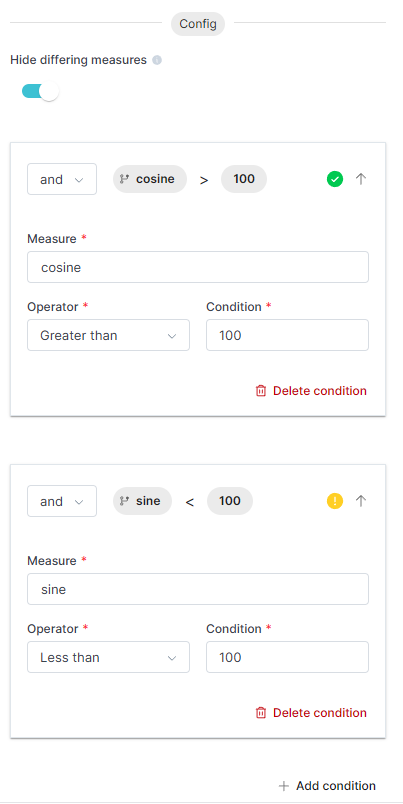
Condition
The Condition node defines the measurement criteria that must be satisfied.
Each condition entry specifies:
| Field | Description |
|---|---|
| Measure | The measurement to evaluate (type the name or select from the list) |
| Operator | Comparison operator: Equal to, Not equal to, Greater than, Less than, Greater than or equal to, Less than or equal to, Between, In |
| Condition | The threshold or reference value |
| Logical Operator | and or or - how this condition is combined with the previous one |
Multiple conditions can be added using + Add condition. Each condition can be expanded or collapsed. Use Delete condition to remove one.
The Hide differing measures toggle at the top of the config panel filters the available measure list to only show measures that are shared across all Things in the selected context.
Triggers
Triggers determine when a rule fires once its conditions are met. Select a trigger type when adding a trigger node.
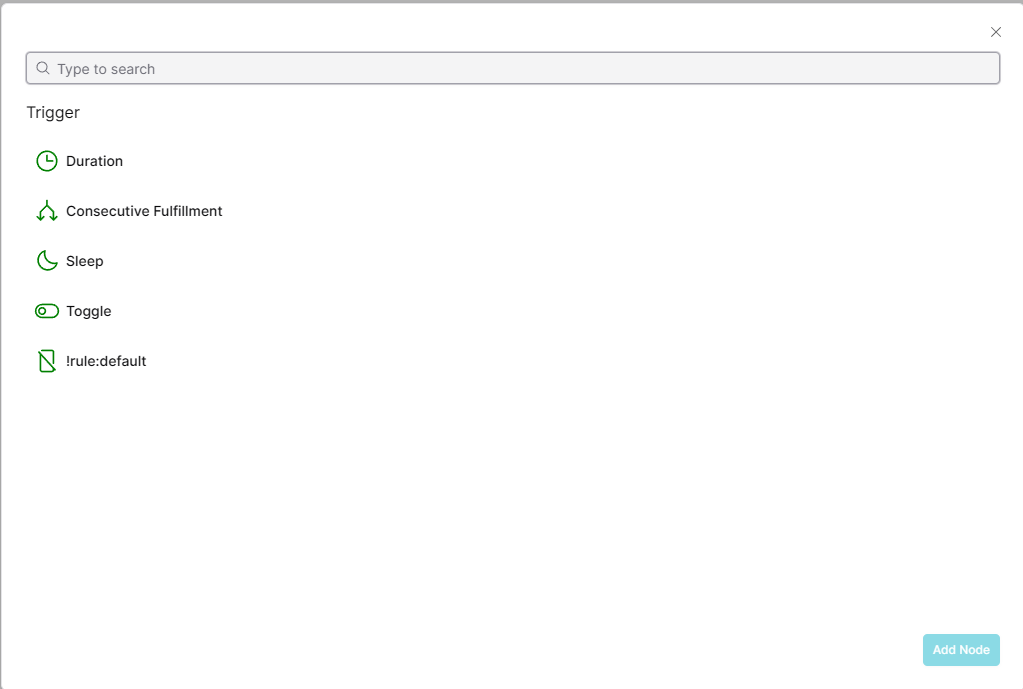
Default Trigger
Fires immediately every time the condition is satisfied. No additional configuration required.
Duration Trigger
Fires after the condition has been continuously met for a specified time period.
| Field | Description |
|---|---|
| Duration | How long the condition must remain true before firing, entered in seconds (e.g. 60 = 1 minute). A human-readable label is shown below the field. |
| First match only | TRUE - fires only the first time the duration is reached. FALSE - fires on every data point while the condition holds. |

Sleep Trigger
Fires after a fixed time interval since the last trigger evaluation.
| Field | Description |
|---|---|
| Sleep period | The interval entered in seconds (e.g. 60 = 1 minute). A human-readable label is shown below the field. |

Consecutive Fulfillment Trigger
Fires when the condition has been met for a specified number of consecutive data points.
| Field | Description |
|---|---|
| Fulfillment Target | Number of consecutive condition-satisfying measurements required |
| First match only | TRUE - fires only the first time the target count is reached. FALSE - fires every time the count is met. |

Toggle Trigger
Fires when the condition changes state (transitions in or out of fulfillment).
| Field | Description |
|---|---|
| Direction | IN (fires when condition becomes true), OUT (fires when it becomes false), or EVERY (fires on both) |

Actions
Actions execute when a trigger fires. Multiple actions can be chained after a trigger.
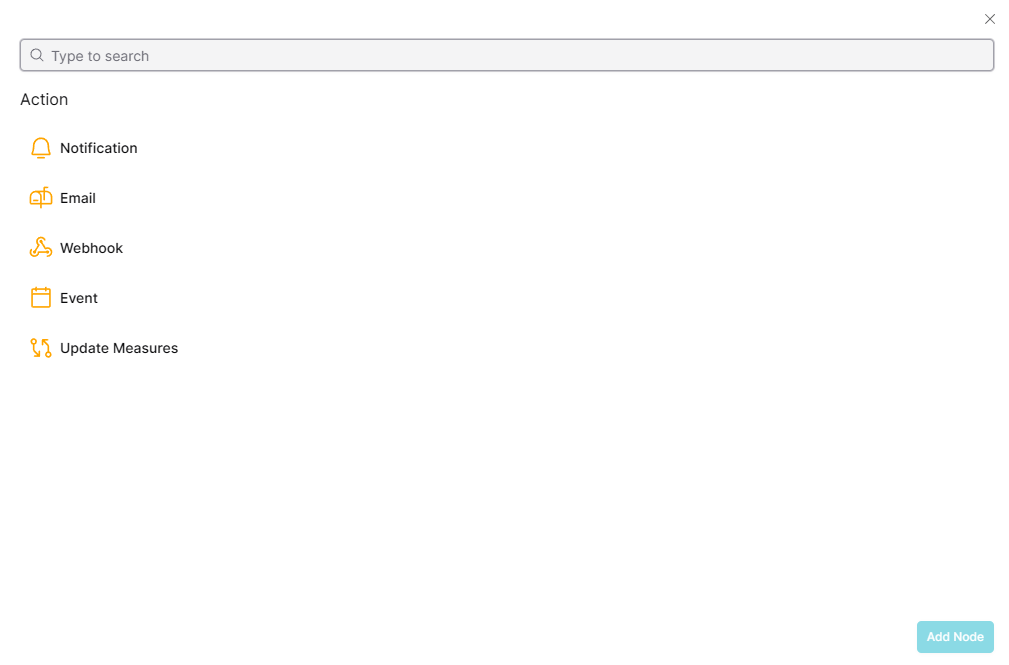
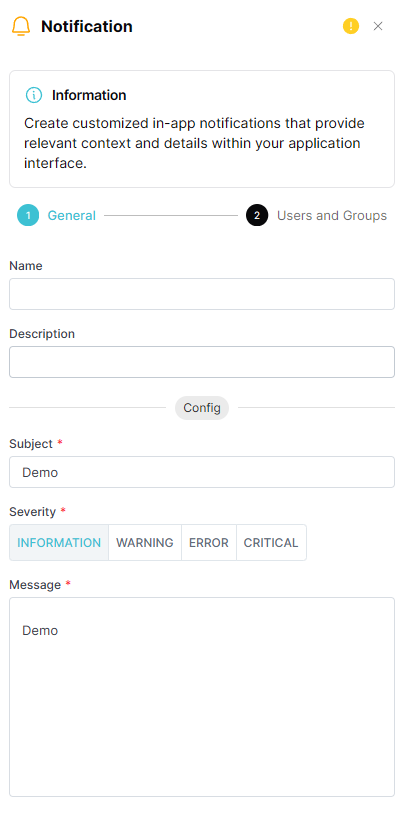
Notification
Sends an in-app notification to selected users or groups.
Configuration uses a 2-step wizard: General (message content) → Users and Groups (recipients).
| Field | Description |
|---|---|
| Name | Internal label for this action node |
| Description | Optional note |
| Subject | Notification subject line (required) |
| Severity | Information, Warning, Error, or Critical |
| Message | Notification body text (required) |
| Recipients | Individual users to notify (step 2 — Users and Groups) |
| Groups | User groups to notify (step 2 — Users and Groups) |
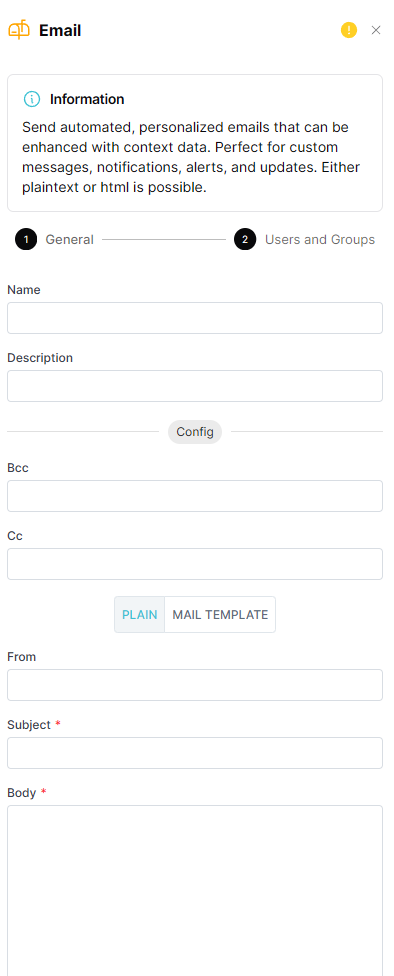
Email
Sends an email using plain text content or a configured mail template.
Configuration uses a 2-step wizard: General (message content) → Users and Groups (recipients).
| Field | Description |
|---|---|
| Name | Internal label for this action node |
| Description | Optional note |
| Bcc | Blind copy recipients |
| Cc | Copy recipients |
| Format Type | Plain or Mail Template |
| From | Sender address |
| Subject | Email subject (required) |
| Body | Email content (required for Plain format) |
| Recipients | Individual email recipients (step 2 — Users and Groups) |
| Groups | User groups to email (step 2 — Users and Groups) |
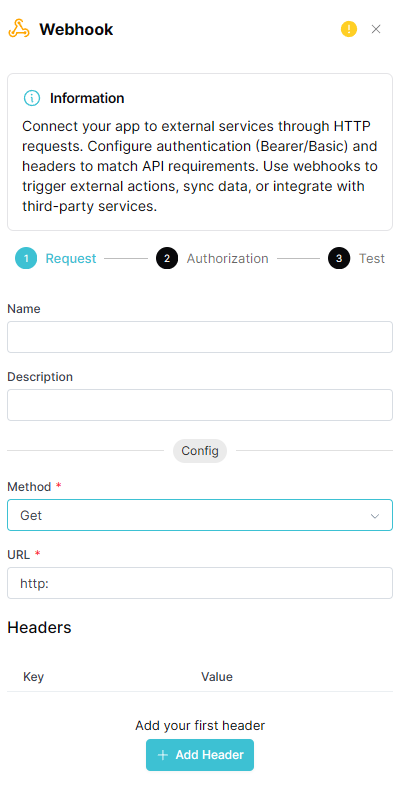
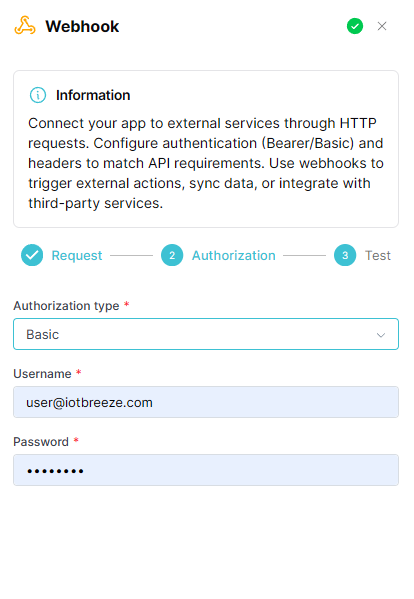
Webhook
Makes an HTTP request to an external endpoint.
Configuration uses a 3-step wizard: Request → Authorization → Test.
| Field | Description |
|---|---|
| Name | Internal label for this action node |
| Description | Optional note |
| Method | GET, POST, PUT, PATCH, or DELETE (required) |
| URL | Target endpoint (required) |
| Headers | Custom key-value HTTP headers (add with + Add Header) |
| Authorization | None, Bearer Token, Basic, Query Parameter, or OAuth2 |
OAuth2 grant types: Client Credentials, Password, Refresh Token, JWT Bearer.
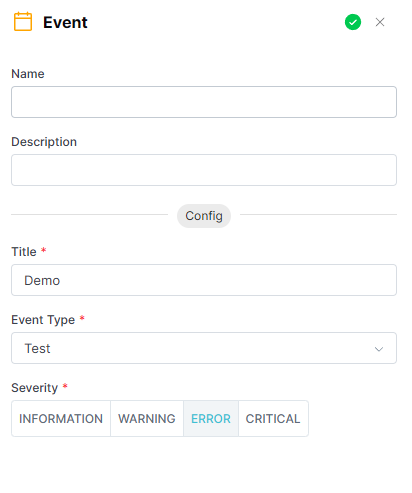
Event
Creates an entry in the Event Log.
| Field | Description |
|---|---|
| Name | Internal label for this action node |
| Description | Optional note |
| Title | Title of the event entry (required) |
| Event Type | The event type to instantiate (required) |
| Severity | Information, Warning, Error, or Critical |
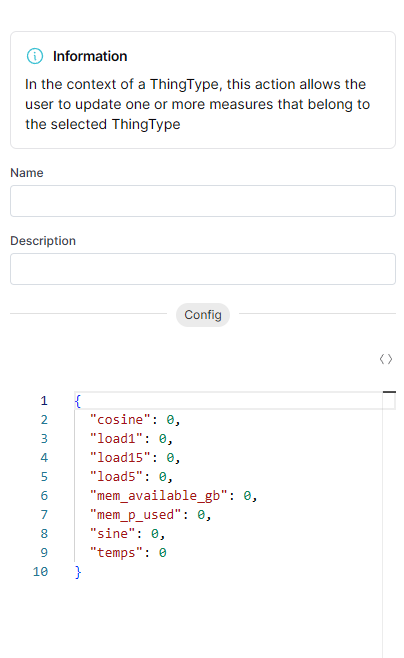
Update Measures
Writes updated measurement values back to one or more Things belonging to the selected Thing Type. The config panel shows a JSON editor pre-populated with all measures from the Thing Type context set to 0. Edit the values as needed.
This action is only available when the Context Selector is set to Thing Type mode.
Versions
The Rule Designer supports multiple versions per rule, enabling safe iteration without disrupting active rules.
Viewing Versions
Click Switch version in the header to open the Version Overview panel. This lists all existing versions with their status (active/inactive), creation date and version number.
Creating a New Version
Click New version in the header. This creates a copy of the current version as a starting draft. Only one version can be active at a time.
Switching Versions
Select any version from the Version Overview. The URL updates with the ?version=<id> query parameter. You can bookmark or share direct links to specific versions.
Activating & Deactivating a Rule
A rule only evaluates live data when it is Active.
- Click Activate in the header to activate the current version. This saves any pending draft changes first.
- Click Deactivate to stop rule evaluation without deleting the rule.
- When a rule is active and you edit the canvas, changes are saved to the Draft only - the live rule is not affected until you Apply Draft.
Tip: The Activate/Deactivate button is disabled (grayed out) if the flow contains validation errors. Check the validation indicator in the toolbar for details.
Auto-Save
Changes to the flow canvas are automatically saved as a draft with a short delay (debounce). A saving indicator appears in the header while the save is in progress.
If you navigate away from the page with unsaved changes, a confirmation dialog warns you before leaving.
Desktop Only
The Rule Designer is a desktop-only feature due to the complexity of the visual editor. It is not accessible on mobile or small-screen devices.