Reports
Reports are scheduled, widget-based documents that capture data snapshots for a specific time window and deliver them to subscribers. Unlike live dashboards, a report is published on a recurring schedule and can be exported as a PDF - making it ideal for recurring summaries, compliance exports, or automated delivery to users who don't have daily access to the platform.
Reports List
Navigate to Reporting in the sidebar to see all reports you have access to.
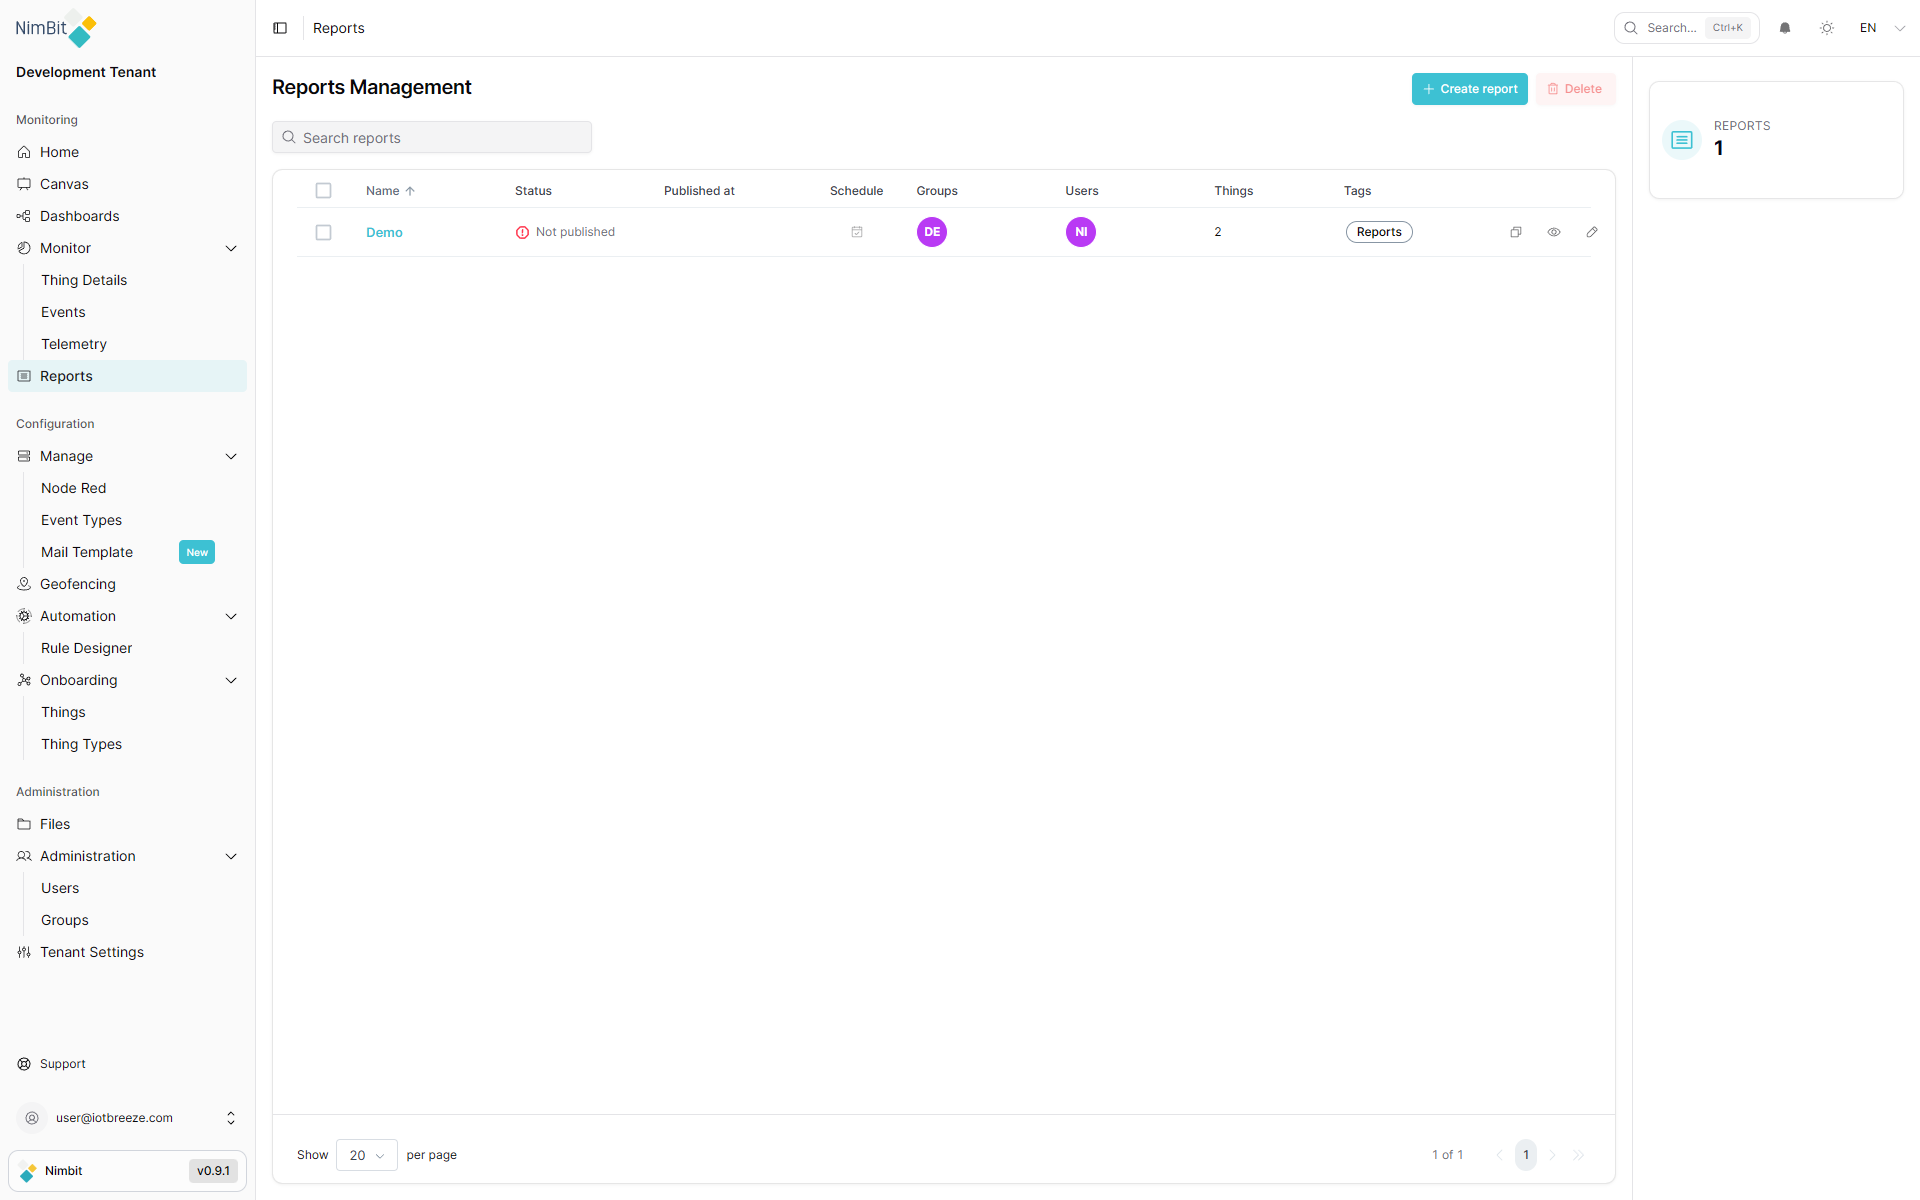
Each row shows:
| Column | Description |
|---|---|
| Name | The report name. |
| Status | Published ✅ or Not published. |
| Published at | Date/time of the last publication. |
| Schedule | Calendar icon - click to open the time frame settings. |
| Groups | Access groups shown as avatar chips. |
| Users | Assigned users shown as avatar chips. |
| Things | Number of Things associated with the report. |
| Tags | Search tags as chips. |
Row actions (right side of each row):
- Copy - duplicates the report configuration.
- View - opens the report in read-only mode.
- Edit - opens the report editor.
Use the Create report button at the top right to create a new report.
Creating a Report
Click Create report to open the creation drawer.
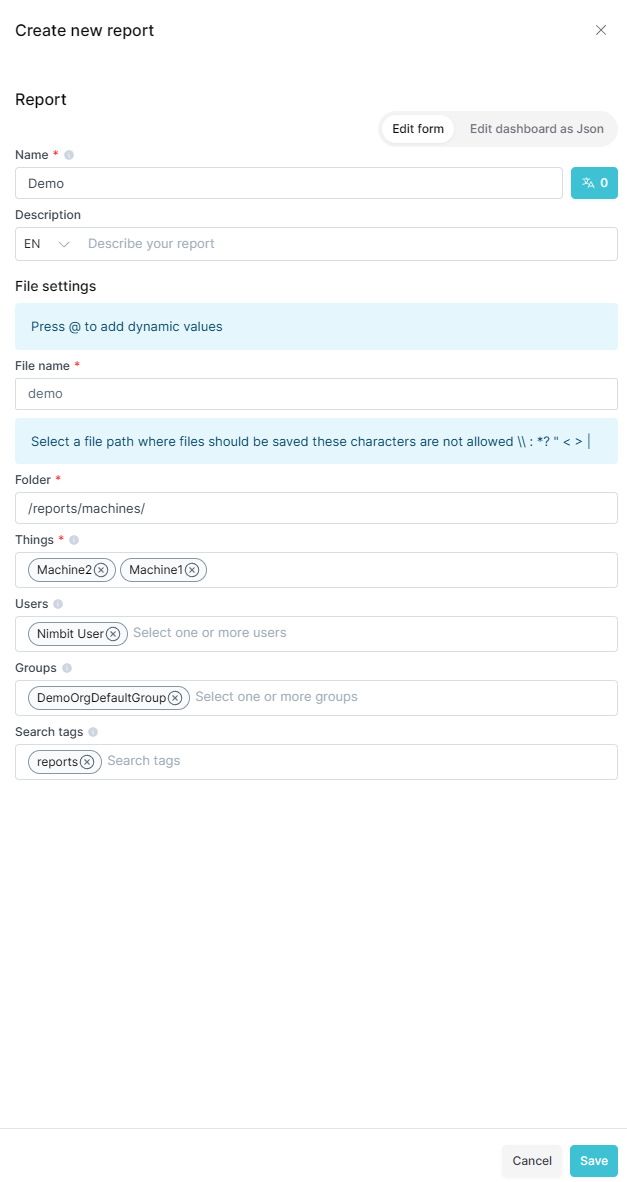
Basic Information
| Field | Required | Description |
|---|---|---|
| Name | ✅ Yes | Unique report name (up to 126 characters). Supports translations. |
| Description | ❌ No | Short description of the report's purpose. |
File Settings
These settings control how generated PDF files are named and where they are saved in the Files explorer.
| Field | Required | Description |
|---|---|---|
| File Name | ✅ Yes | The filename used when generating PDFs (up to 128 characters). Supports dynamic variables - type @ to insert a mention. |
| Folder | ✅ Yes | The path in the Files explorer where PDFs are stored (e.g. /reports/monthly/). |
Dynamic filename variables - type @ in the File Name field to insert:
| Variable | Example output |
|---|---|
{{date}} | 2025-01-15 |
{{date_time}} | 2025-01-15_14:30:00 |
{{day}} | 15 |
{{month}} | 1 |
{{month_long}} | January |
{{month_short}} | Jan |
{{year}} | 2025 |
{{timestamp}} | Unix timestamp |
{{tenant}} | Tenant name |
{{uuid}} | Unique ID |
Access & Data
| Field | Required | Description |
|---|---|---|
| Things | ✅ Yes | One or more Things whose data appears in the report widgets. |
| Users | ❌ No | Users who can access this report. |
| Groups | ❌ No | Groups that can access this report. |
| Search Tags | ❌ No | Tags for filtering in the reports list. |
Click Save to create the report and open the editor.
Report Editor
After creation, the report opens in edit mode. This is where you add and arrange widgets, configure the schedule and manage publishing.
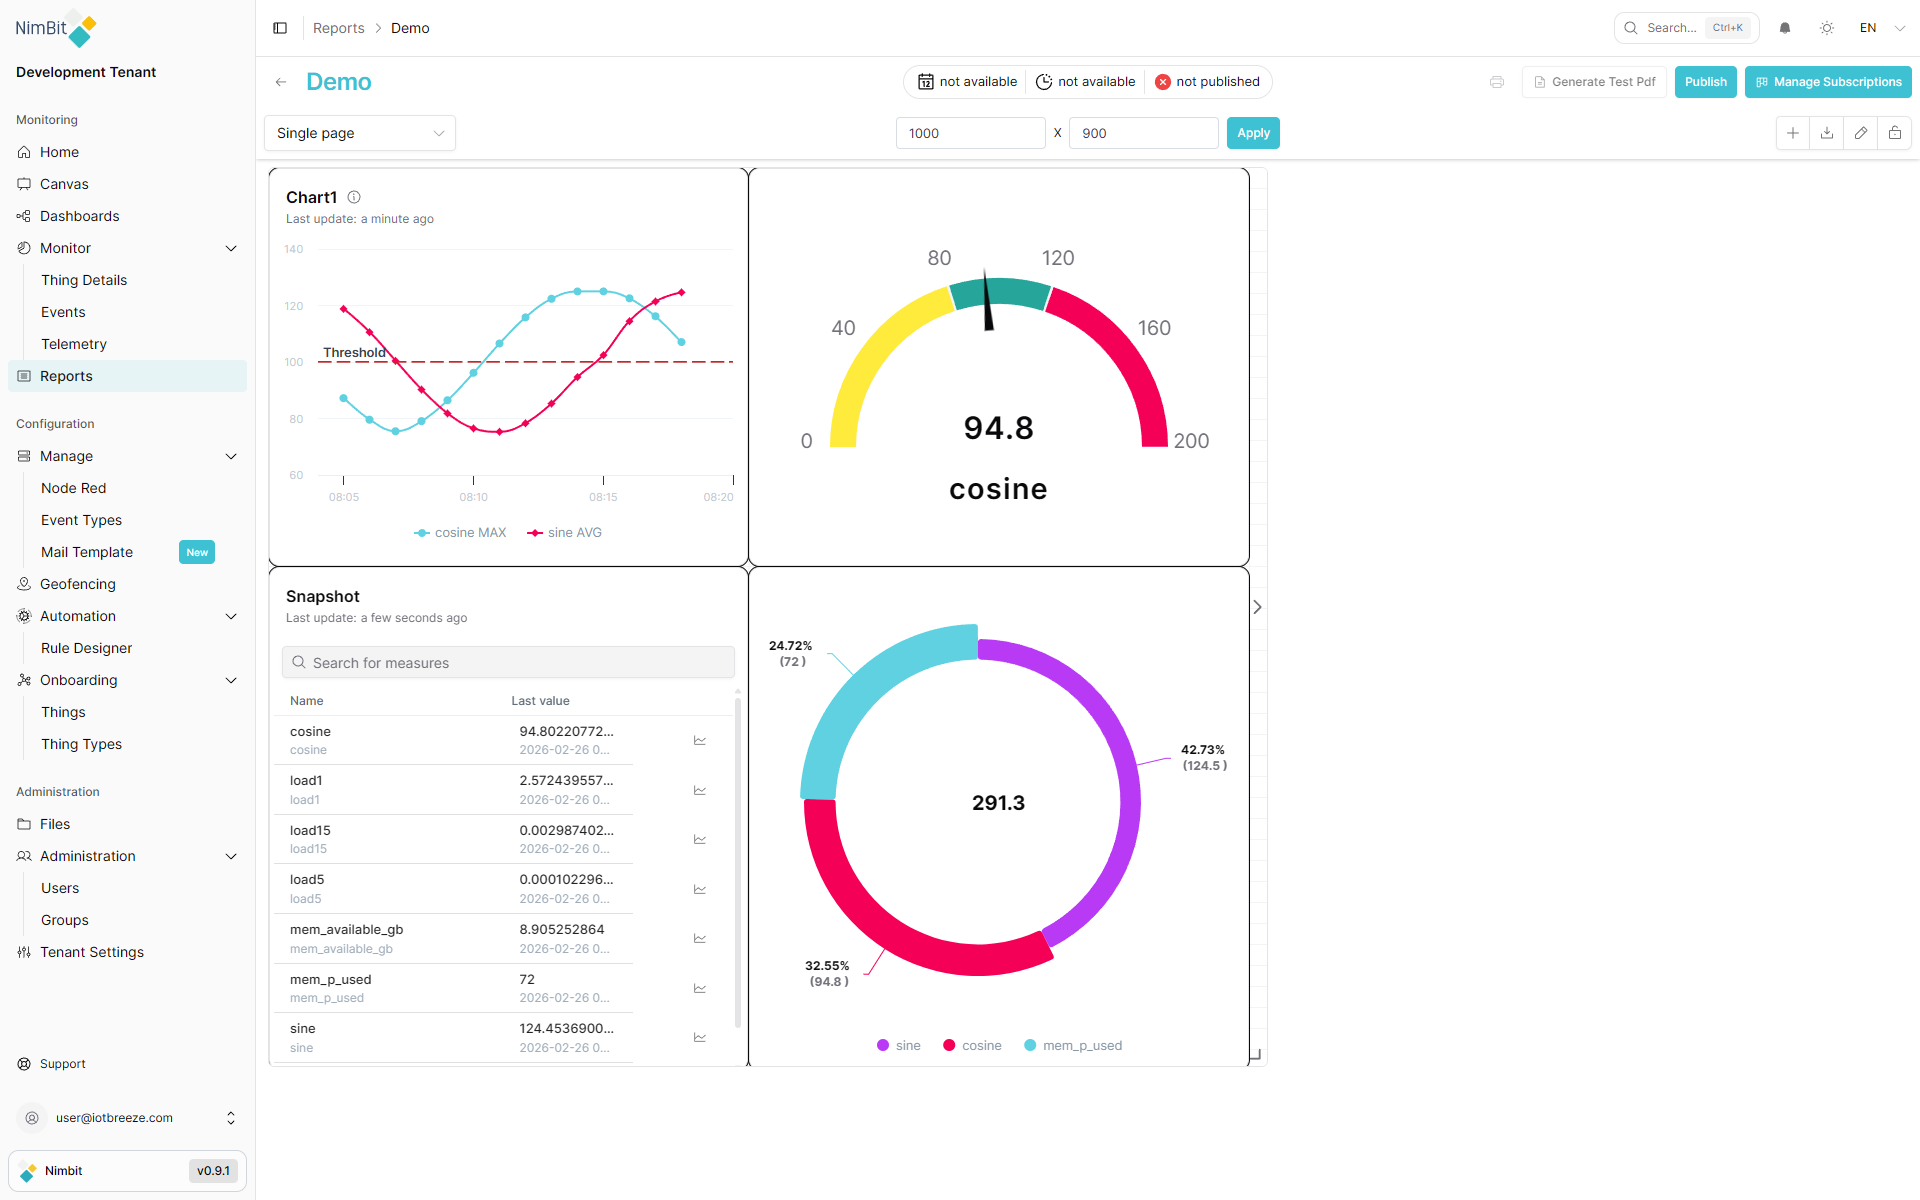
Toolbar Actions
The top toolbar contains:
| Button | Description |
|---|---|
| Save | Saves unsaved widget changes. Disabled when there are no changes or when in diff view. |
| Opens the browser print dialog. Only available when edit mode is locked. | |
| Test PDF | Triggers an async PDF generation. The file is saved to the Files explorer in ~1–2 minutes. Has a 30-second cooldown after triggering. |
| Publish / Unpublish | Toggles the report's published status. Requires a schedule (time frame) to be configured before publishing. |
| Manage Subscriptions | Opens the subscriptions drawer to configure who receives report deliveries. |
The schedule pill in the toolbar shows the current time frame at a glance. Click it to open the time frame settings drawer.

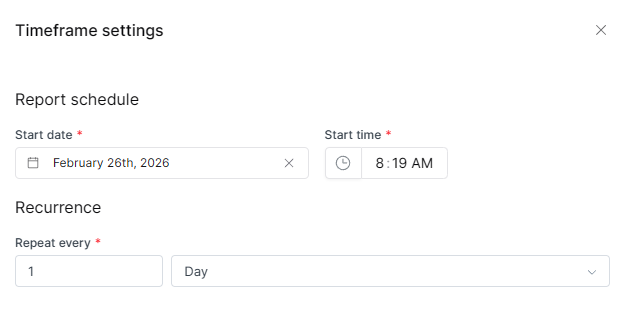
Schedule (Time Frame)
The time frame determines what data window the report captures and when it recurs.
| Setting | Description |
|---|---|
| Lookback period | How far back the report looks from its run time. For example, "7 days" captures the past week of data. |
| Start date | When the schedule begins. |
| Start time | Time of day the first run occurs. |
| Repeat interval | How often the report recurs (e.g. every 1 week, every 1 month). |
Time periods use ISO 8601 duration notation internally (e.g. P7D = 7 days, P1W = 1 week, P1M = 1 month).
A schedule must be configured before a report can be published. If you click Publish without a schedule, the time frame drawer opens automatically.
Publishing a Report
Toggle the report's published status with the Publish / Unpublish button in the toolbar.
| State | Behavior |
|---|---|
| Not published | The report exists but does not run automatically. Subscribers receive no deliveries. |
| Published | The report runs on the configured schedule and generates PDFs. Subscribers are notified or emailed as configured. |
The Status column in the reports list shows the current state with a green checkmark (published) or orange no-entry icon (not published).
Publishing requires a time frame to be configured. The Published at date is updated each time the report successfully runs.
Subscriptions
Subscriptions determine who receives the report when it runs. Open the subscriptions drawer with Manage Subscriptions in the toolbar.
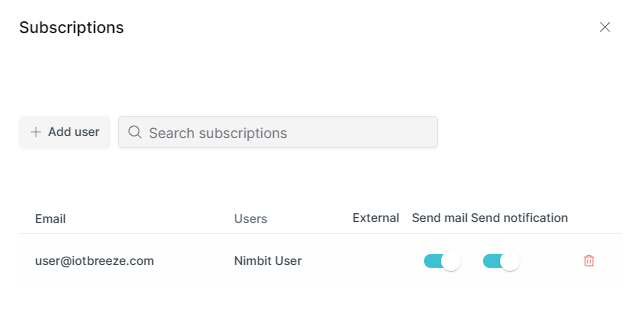
Adding Subscribers
Type a user's name to select an internal user, or type an email address to add an external subscriber.
Each subscription can be configured with:
| Option | Description |
|---|---|
| Send email | Sends the report PDF as an email attachment when the report runs. Requires SMTP to be configured. |
| Send notification | Sends an in-app notification when the report runs. Only available for internal users. |
Managing Subscriptions
- Click the delete icon next to a subscriber to remove them.
- A confirmation dialog appears before deletion.
If your tenant's SMTP is not configured, enabling Send email will show a warning. Contact your administrator to configure email delivery.
Viewing Reports
A report can be viewed in two modes:
Edit mode
Opened from the Edit row action or directly from the editor. Shows the full toolbar and allows adding/editing widgets and managing settings.
Read-only (View) mode
Opened from the View row action. Shows the report with a simplified header: the report name, a back button and a Print button. No editing tools are shown.
Public URL
Each report has a public bare URL at:
/bare/report/{report-id}
This URL shows a minimal read-only view (no application sidebar or top navigation) suitable for embedding or sharing as a link. The viewer sees the report name and a print button.
Report Widgets
Widgets are the content building blocks of a report. Reports use the same widget types as dashboards, displayed on a fixed-size page canvas.
Page Settings
The report canvas size is configured via Page Settings (accessible from the report form):
| Setting | Description |
|---|---|
| Page size | Predefined paper size (A4, A3, etc.) or custom dimensions. |
| Frame width / height | Canvas dimensions in pixels for custom page sizes. |
Adding Widgets
In edit mode, use the widget picker to add widgets to the report canvas. Widgets are arranged in a grid and can be resized and repositioned.
For a full reference of available widget types and their configuration, see the Widgets documentation.
Test PDF
Use the Test PDF button to preview how the report will look when generated on schedule.
- Generation is asynchronous - the PDF becomes available in the Files explorer in approximately 1–2 minutes.
- The filename and folder configured in the report settings are used.
- A 30-second cooldown prevents accidental repeated generation.
- A toast notification confirms that generation has started.
Use Test PDF before publishing to verify that layout, data and filename variables render correctly.